We've been seeing a number of reports via support and in the App Store regarding Mint QuickView not working and launching with a blank screen or getting stuck on Downloading Data. Clearly we would never have shipped the product this way so this has made us feel terrible that a number of people were running into this issue. What a truly horrible experience. We tried everything we could to reproduce it in house and we just couldn't figure it out so we asked a number of people who reported the issue to help us out and a number of really great customers installed special versions of the software on their machine and we were finally able to track it down. The issue: fonts. Mint QuickView uses Helvetica Neue and Georgia as the main fonts in the UI. This gives it that unique Minty look and feel. Well if you disabled either one of these fonts on your system using Font Book or some other Font management app then QuickView would hang when it tried to use those fonts. We didn't have font substitution support. We had this thing beta tested within Intuit for 2 months and never ran into this issue. Who knew so many people disabled fonts. In any case, we should have caught it before it went out and I'm truly sorry for those of you that have run into this issue. Hopefully you'd be willing to give us another try.
The Fix
The fix is pretty easy. Just enable the Helvetica Neue and Georgia fonts and QuickView will work without a hitch...at least it won't be blank or get stuck downloading data. If you don't want to turn on these fonts, we're working on a permanent fix that won't get hung up on fonts but I'm not sure when we'll be ready to release this version.
I'd like to express a big thank you to our customers that helped us find this issue. Thanks for being patient with us and helping us test various things to figure out the root problem.
Now we're trying to find an issue with passwords. For some reason there are a few people who enter in correct passwords for the web site but for some reason it's getting rejected by Mint.com. Hopefully we'll figure out something shortly.
Showing posts with label Mac. Show all posts
Showing posts with label Mac. Show all posts
Wednesday, July 25, 2012


Sunday, July 15, 2012
Mint QuickView Questions and Answers 2
We're avidly and some could argue psychotically monitoring the comments in the Mac App Store and the feedback emails people have been posting regarding Mint QuickView. I'm posting a bunch of stuff to this site. Other than this post, I also have the following other posts:
Here are more answers to your questions.
Q: What is the point of Mint QuickView when I can just go to mint.com?
A: We love that you like mint.com. There is absolutely no reason to use Mint QuickView if you don't see a need. Personally, there are a few reasons we built it and use it daily that you might want to consider.
Here are more answers to your questions.
Q: What is the point of Mint QuickView when I can just go to mint.com?
A: We love that you like mint.com. There is absolutely no reason to use Mint QuickView if you don't see a need. Personally, there are a few reasons we built it and use it daily that you might want to consider.
- Mint QuickView updates throughout the day and will notify me when a new transaction has arrived in my account without me having to lift a finger or click on a browser tab.
- Auto-login. I hate typing in a user name and password every time I go to the site and I even use 1Password so it really isn't that painful. I find myself going to QuickView just to launch mint.com.
- Mint QuickView has less stuff. Most of the time I just want to do a quick look to see what's new in my account, check that a check has been posted, or see if I should be laying off the credit cards a bit. I typically don't need the full power of the Mint.com site. Sometimes less is more.
Q: What does the number in the menu bar badge refer to?
A: The number displays the count of anything new in your account. Specifically it tracks updated transactions, new alerts or advice. We identify the new items in 2 different ways. For transactions there is a blue dot next to the each transaction item. For alerts and advice there is a blue ellipse with the words NEW in the title to let you know which of those are new.
Q: When does the number in the menu bar badge get cleared?
A: This is a little tricky because it's different for different things. Transactions get cleared once you open QuickView and dismiss it. When you open QuickView again, the blue dots go away. Alerts and Advice are different and this is where the number in the menu bar may not match what you think it should be. Alerts and Advice don't clear until you actually see the alert and advice. So to clear these you have to go through the alerts and advice to clear them. These clear as you view them and the number in the menu bar will decrement at this time.
Q: Why is it that sometimes the same transaction will appear new twice?
A: We are basically tracking when transactions have been updated so sometimes you'll see a transaction when it's pending and we'll identify it as being new. Then your bank will clear the transaction and it moves from being pending to being real and so we'll flag it as being new again.
Q: Can you add a feature so the icon only appears in the menu bar and not the dock?
A: We already have it. Go to the Gear icon and launch preferences. Under the General tab you'll see a checkbox for Show in Dock. Uncheck this and it won't Show in the Dock anymore. But you do lose some capabilities like you won't be able to CMD+TAB to it and there won't be any menus.
Q: When will you make it possible to edit a transaction in QuickView?
A: We hear you loud and clear. This is the number one feature request from everyone including the Vice President of our division, my manager and lots and lots of you. We'll see. We wanted to release a really solid read only app to get feedback, to understand any issues people are finding, and to learn about how people are using it. There are lots of things to consider when allowing people to edit heir account in QuickView so we'll continue to look at it but I just wanted to let everyone know that we've heard you and are thinking about it.
Q: Can you add Net Worth?
A: We already show you your current Net Worth when you look at the Accounts view. That big number or possibly small number in my case is your Net Worth. It's the summation of all your checking, savings, investments, property minus all of your loans and credit card. If you're asking about a Net Worth chart, we probably won't be doing that for awhile. It's technically possible but there are technical reasons we'd rather not tackle this any time soon so don't hold your breath on this one.
That's if for now. Again I send out tips and tricks and Q&A stuff via twitter so follow me if you're interested.
Thursday, July 12, 2012
Mint QuickView Questions and Answers 1
All of us on the Mint for Mac team are really excited that customers appear to like the Mint QuickView product. The reviews have been great on the Mac App Store with around 98% of customers rating the product a 4 or 5 stars. We're the number one free app in the store at least for now and there have been lots of Twitter traffic. I'm posting a bunch of stuff to this site. Other than this post, I also have the following other posts:
But of course customers have questions and so I've got answers...
Q: Hope they can add an option to make the notification badge black and white too?
A: Oops. Quite honestly we just missed this. We will update the graphics in our next update. The badge should be black and white when the menu bar icon is black and white.
Q: Not updating
A: Unfortunately Mint QuickView went live a few hours before we expected and this was during our regular server maintenance when the servers go offline. If you tried QuickView between 10 and 12pm PST on 7/10, please try QuickView again. It will work now. If this continues to be an issue, please send us email at mintqvfeedback@intuit.com so we can work with you to try to figure out the issue.
Q: CRASH!
A: Yuck. It would be great if you could send us an email to mintqvfeedback@intuit.com so that we can gather more information regarding why QuickView crashed.
Q: What I'm not so happy about: This app just sitting in the menu bar is using 160-180mb of RAM.
A: Wow, that doesn't sound right. On my machine it's using 34.5 MB. It's a really small app. Please check back and see if it continues to be that large. Possibly you caught QuickView during a data refresh. Someone else reported this in the Mac App Store comments so it's definitely happening but it shouldn't. It would be good if you can contact us via the Feedback item in QuickView under the Gear icon so we can work with you to figure out why it's happening. Do you have a really large data set?
Q: The Trends and Investment page doesn't look like the mint.com website.
A: QuickView doesn't support Flash so the charts won't work when using the built-in QuickView browser. However, we're about to roll out a hot new Trends page on mint.com that will start to be migrated to users theoretically next week. This doesn't use Flash and will work great in QuickView. Unfortunately investments will continue to be without it's charts.
Q: Export to CSV doesn't work from the QuickView browser
A: Unfortunately this is true. However, QuickView itself has Export to CSV built into the product. Just do a search of what you want to export and then right click on the transaction list and select Export Transactions. This will export the current transaction list to CSV.
Q: The issue I have is that...I have to click the little gear icon in the bottom right-hand corner to make the app prompt me for my passcode.
A: The passcode stuff is a little confusing. Here's how it works. If you have a passcode and the timer set which is the default we give you a grace period before showing you the passcode again based on the time set in the timer. The reason we do this is so you can go to mint.com using our built-in browser and then go back to QuickView without being prompted for the passcode. The default timer setting is 5 minutes. What this means is that if you walk away from for your desk, someone theoretically can open QuickView without being prompted for 5 minutes. After the 5 minute time is reached then the prompt will appear. If this is too long, then you can change the timer and make it 1 minute so that it's a much shorter grace period or you can click on the lock icon and the prompt will be forced immediately.
Q: The app appears to hang at times when you click on a feature that requires the full window to appear.
A: The performance of launching the built-in QuickView browser and actually seeing the mint.com site isn't great. Unfortunately there doesn't appear to be a way we can speed this along. This might be a reason you're seeing a slight stutter when launching the browser window.
Q: Why do you have the built-in browser? Why not just launch Safari?
A: We did this so we can auto-log you into the Mint.com site. We think this is one of the key benefits of QuickView. There currently isn't a way we could implement auto-login with a default browser from QuickView today. We hope in time this can be improved.
But of course customers have questions and so I've got answers...
Q: Hope they can add an option to make the notification badge black and white too?
A: Oops. Quite honestly we just missed this. We will update the graphics in our next update. The badge should be black and white when the menu bar icon is black and white.
Q: Not updating
A: Unfortunately Mint QuickView went live a few hours before we expected and this was during our regular server maintenance when the servers go offline. If you tried QuickView between 10 and 12pm PST on 7/10, please try QuickView again. It will work now. If this continues to be an issue, please send us email at mintqvfeedback@intuit.com so we can work with you to try to figure out the issue.
Q: CRASH!
A: Yuck. It would be great if you could send us an email to mintqvfeedback@intuit.com so that we can gather more information regarding why QuickView crashed.
Q: What I'm not so happy about: This app just sitting in the menu bar is using 160-180mb of RAM.
A: Wow, that doesn't sound right. On my machine it's using 34.5 MB. It's a really small app. Please check back and see if it continues to be that large. Possibly you caught QuickView during a data refresh. Someone else reported this in the Mac App Store comments so it's definitely happening but it shouldn't. It would be good if you can contact us via the Feedback item in QuickView under the Gear icon so we can work with you to figure out why it's happening. Do you have a really large data set?
Q: The Trends and Investment page doesn't look like the mint.com website.
A: QuickView doesn't support Flash so the charts won't work when using the built-in QuickView browser. However, we're about to roll out a hot new Trends page on mint.com that will start to be migrated to users theoretically next week. This doesn't use Flash and will work great in QuickView. Unfortunately investments will continue to be without it's charts.
Q: Export to CSV doesn't work from the QuickView browser
A: Unfortunately this is true. However, QuickView itself has Export to CSV built into the product. Just do a search of what you want to export and then right click on the transaction list and select Export Transactions. This will export the current transaction list to CSV.
Q: The issue I have is that...I have to click the little gear icon in the bottom right-hand corner to make the app prompt me for my passcode.
A: The passcode stuff is a little confusing. Here's how it works. If you have a passcode and the timer set which is the default we give you a grace period before showing you the passcode again based on the time set in the timer. The reason we do this is so you can go to mint.com using our built-in browser and then go back to QuickView without being prompted for the passcode. The default timer setting is 5 minutes. What this means is that if you walk away from for your desk, someone theoretically can open QuickView without being prompted for 5 minutes. After the 5 minute time is reached then the prompt will appear. If this is too long, then you can change the timer and make it 1 minute so that it's a much shorter grace period or you can click on the lock icon and the prompt will be forced immediately.
Q: The app appears to hang at times when you click on a feature that requires the full window to appear.
A: The performance of launching the built-in QuickView browser and actually seeing the mint.com site isn't great. Unfortunately there doesn't appear to be a way we can speed this along. This might be a reason you're seeing a slight stutter when launching the browser window.
Q: Why do you have the built-in browser? Why not just launch Safari?
A: We did this so we can auto-log you into the Mint.com site. We think this is one of the key benefits of QuickView. There currently isn't a way we could implement auto-login with a default browser from QuickView today. We hope in time this can be improved.
Hopefully this helps answer a few questions. Thanks again for all the great comments in the app store and use the feedback email address to give us your feature requests. You can find it under the Gear icon.
If your interested in getting these tips and tricks via twitter, follow me at @mint4mac.
Follow @Mint4Mac
If your interested in getting these tips and tricks via twitter, follow me at @mint4mac.
Follow @Mint4Mac
Wednesday, July 11, 2012
Mint QuickView Tips and Tricks 1
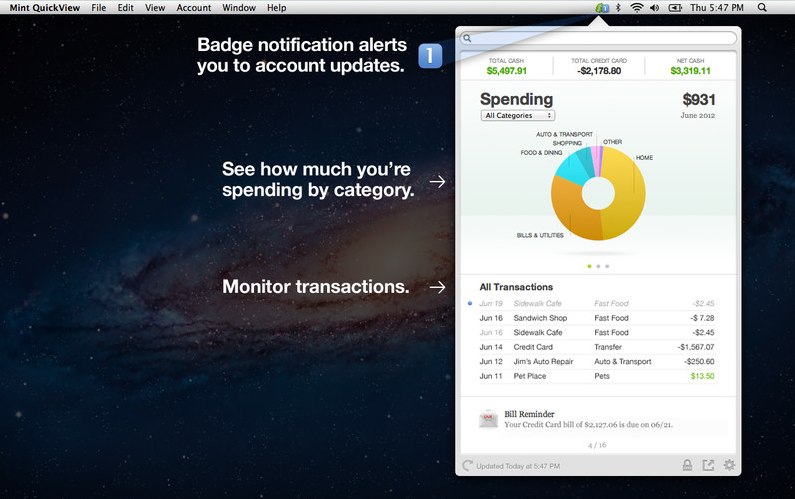
Today's a really exciting day. My team at Intuit just launched our first app called Mint QuickView for Macintosh. This is a huge milestone for us because we're all new to the company and one hasn't really earned their stripes until they ship something. Click here to download it.
What is Mint QuickView? Mint QuickView is a companion app to the Mint.com website that works on your Mac and provides you a snapshot of what's going on with your personal finances. It updates through out the day and lets you know when something new hits your account. There are also handy little charts that let you see your spending, net income and account balances. If you like to keep tabs on your money, this is the app for you.
For those of you who aren't familiar with Mint...Mint.com is a free website that aggregates all of your checking, savings, credit card, loan, investments and property accounts in one site to allow you to track and analyze your personal finances. We also have an iPhone, iPad, Android Phone and Android Tablet app which are pretty cool.
A number of friends of mine have expressed concern about entering their financial account information into the Mint.com website and I totally get that. I was the same way until I wanted to interview at Mint and thought I better use the product before I chat with them. The bottom line is that the security is really really tight and to me the benefit out ranks the risk. I have gained a lot by using Mint. There's a lot of incite and benefit you receive from having all of your accounts in an easy to track location and it's been tremendously helpful. First off my wife loves the iPad app and she now actually reviews our finances daily. She never looked at it before. Also because we're both looking at this stuff all the time, we actually spend less money because we know the other will spot it instantly. Finally, I've seen things that I didn't know were occurring in my account like little fees that Fidelity was charging me because I owned a foreign stock. Suffice it to say that I'm now a believer in Mint and will be a customer for life. Sorry, I'm not trying to sell it because I work there but I've been really happy with how it's helped me get my personal finances in order. Also, did I mention it's free?
So with that background you can see why my team and I developed Mint QuickView. We really designed it for ourselves. It's a pretty simple product so you may have found all of these tips and tricks already but just in case you haven't...
1) Two Finger Swipable - I'm guessing that's not a real word but QuickView is designed to work with your trackpad. When your mouse is over the charts use two finger to swipe left and right on your trackpad and you'll get new charts. you can also use CMD+1, CMD+2, and CMD+3 to go directly to the spending, net income and account charts.
2) Hit space bar in the search field to grow the transaction list - The official way to grow the transaction list is to click on the See More button below the transaction but if that's too much work just add a space in the search field and the list will grow tall and you'll see more of your transactions and you'll get a total.
3) Search for tags, notes and most anything in a transaction - Speaking of search, there's nowhere in the product that tells you what we search on. Well we search on practically everything in a transaction so go for it. We even search on the notes field which even the mint.com site doesn't do. We like to rub salt in their wounds on that one.
4) Don't like charts, hide them - When we were building QuickView we had some pretty vocal people internally who hated the charts and felt they took up too much space that would be better served by the transaction list. Well they are probably right but I like charts and think long lists of text is boring. But if you are one of those that also hates the charts, you can run QuickView without ever seeing them. Simply click on See More and leave it up. QuickView will remember this state. You can still swipe to different sections and then use the drop down list to filter the transaction list all without having to see a chart.
5) Don't like menu apps, snap QuickView off of the menu bar - We also heard loud and clear from beta customers that some of them don't like menu bar apps. Gee it's like religion or something to people. Some love them and some hate them. Well we built QuickView for everyone. Just go to preferences under the Gear menu and uncheck "Attach window to menu bar". Now you'll be able to leave QuickView up all the time and drag it around even to a second monitor.
6) Passcode protect your personal finances - One of the first things we added to QuickView when we were building the app was a passcode feature. Primarily because we're all running QuickView in the office and who wants to leave it available to anyone to just walk by your desk and find out how terribly poor you are. By the way, we call it a passcode but it can have numbers, letters, special characters and be any length you want. It's really a password but we didn't want to confuse people with the password that lets you see your QuickView data and the password to login to your Mint account. To set the passcode, just click on the lock icon in the bottom right corner. Once set you can use the lock icon to immediately put QuickView into passcode mode.
7) Edit your transactions - We think one of the first feature requests people will have is to be able to edit their transaction from within QuickView especially when you see that uncategorized transaction appear. We didn't add it to this first release but we do know it's important. Just right click on the transaction you want to edit and click on the Edit This Transaction... menu item. This will bring up the mint.com site and will find the current transaction to allow you to edit it.
8) Find out what the heck this transaction is - As you may guess, we've been using QuickView internally for the past 6 months and have had quite a few of our own feature requests. One of the things we've noticed with our own accounts is that there are times you have no idea what a particular transaction is. There are a few things you can do. First off there are tooltips for the transactions so just hover over a transaction and the tooltip will tell you the actual bank name for a particular transaction and this is sometimes really helpful. Mint does a pretty good job of translating these things but sometimes it does a really bad job and so you want to double check the actual name from the bank. Second, if you right click on a transaction you can use the Search with Google feature. This simply uses the merchant name and tries to search for it using your default search provider. Sometimes this can help you identify a strange merchant name. Third, I think this is the coolest feature, right click on the transaction and select Send This Transaction. This will bring up your email an dump a bunch of transaction information into an email so you can send it to your spouse to ask him or her what the heck a particular transaction is.
9) Export Transactions as CSV - As you may have noticed, we have a lot of things hidden on our right click menus. Here's another one. If you filter the transaction list or simply want all of your transactions to export to Excel, right click on the transaction list and select Export Transactions. This will export the current list of transactions into the CSV format which you can then import into Excel or another personal finance application.
10) Change the sort order of Transactions - Another hidden feature is the ability to change the sort order of the transactions. You change sort by date, merchant, category or amount. Just make sure you select Reset to Default Sort to get everything back to normal.
Anyway, I hope these tips help you get the most out of QuickView. Under the QuickView Gear button we have a Send Feedback menu item. Click that to let us know what features you would like to see in a future version of QuickView or any other Mint product you would like to see on the Mac. I've also started a twitter account called @mint4mac. Follow me and get the latest on QuickView and other things we're working on. Here are some other posts on Mint QuickView to check out:
Follow @Mint4Mac
Friday, May 18, 2012
Is the MacBook Air 11" Too Small?
I owned the original Air when it first came out and I've used the upgraded MacBook Air 13" at work. I really liked it and thought the screen was perfect. So why not just get that computer. Well for one I'm kind of cheap and the 11" is just a tad cheaper. The other thing is this is going to be my vacation computer and I don't really want to lug more than I need. In fact I mostly use my iPad on vacation now but there are still times you need a computer.
Anyway, I took a chance and I've been perfectly happy with the 11". I haven't taken it on vacation yet and since I just started a new job I probably won't be taking many vacations any time soon.
The 11" Air is small enough for my wife to put in her purse. Now it's a big purse so I guess it's not that impressive but the main point is that I don't think the 13" Air would have fit. The speed of the system is fine. I don't tend to crunch huge spreadsheets or render massive 3D graphics on this computer...or any computer for that matter but the speed has been fine. I've actually played Civ V on it and it worked even though the Civ V reqs say it shouldn't. You don't get any fancy effects like clouds and stuff but it played. I also have Parallels running Windows 7 on it too and it also works well.
Anyway, in my opinion the MacBook Air 11" is fine. And remember I have bifocals so my eyes aren't that good and it's still fine for me. Definitely go to an Apple Store to check it out before you buy.
Wednesday, June 29, 2011
PowerPoint Embedded Presentation
One of the cool new features of SkyDrive is the ability to embed a PowerPoint presentation in one's blog or web page. Here are the steps to do this.
That's all you need to do. This is using the free PowerPoint Web Application and is much better then generating HTML from PowerPoint and trying to get it to work within one's web page.
- Create a shared folder on your SkyDrive account. It's free so there's no cost to you.
- Put your presentation in the shared location. You should now see you presentation in the list of files under the shared folder.
- Click on the "i" icon on the right side of the document. A right panel will appear.
- Under Share click on the Embed link and then copy the iframe and paste this into your blog. In the case of Blogger I just clicked on the Edit HTML tab in the compose window and pasted it into there and then it appeared below.
That's all you need to do. This is using the free PowerPoint Web Application and is much better then generating HTML from PowerPoint and trying to get it to work within one's web page.
Friday, January 28, 2011
Printer Drivers for Old Printers
I was pretty excited when I got my new Mac last year. What I wasn't really excited about was the fact that my new Mac couldn't connect to a couple of my existing printers. I was a little annoyed because I was being forced to buy a new printer (just after I bought this expensive new Mac) because I had the good fortune of having printers that actually lasted longer than a year. I have an HP LaserJet 6L which must be like 10 years old and a Canon MultiPass MP730 which is probably like 8 years old. As you may guess this doesn't really fly with the wife who is pretty annoyed that you now have to buy 2 new things instead of the one you promised. She pretty much thinks either this was your ulterior motive from the beginning or that you're an idiot for not doing enough research. Wow, what can I say? Anyway, I had found myself in this dilemma.
Thank goodness for Bing (well actually Google but since I work at Microsoft I must try to plug the company's wares every chance I get). I did a search and came across some newsgroups discussions talking about the Gutenprint Open Source printer drivers for old printers that wouldn't die.
Here's how to install these new drivers.
I totally get the OpenSource movement now that I use these Getenprint drivers, Handbrake and VLC. It's really great that these developers share their work for free for the benefit of all. I applaud you.
Thank goodness for Bing (well actually Google but since I work at Microsoft I must try to plug the company's wares every chance I get). I did a search and came across some newsgroups discussions talking about the Gutenprint Open Source printer drivers for old printers that wouldn't die.
Here's how to install these new drivers.
- Just click on one of the download links. On a Mac it will download the DMG file and open up automatically like a hard drive.
- Double Click the Installer and Install the Gutenprint printer drivers.
- In OS 10.5 (Snow Leopard) go to the System Preferences and open the Print and Fax preferences.
- Click on the + sign to add a new printer.
- If you're lucky the printer will just show up by Default. Just click on it in the list.
- The key thing now is to select the print driver by selecting the "Print Using" pop up and then picking "Select Printer Software" which pops up a dialog with a list of hundreds of printers. The auto select feature isn't able to associate your printer with the appropriate Gutenprint drivers so you'll have to select it manually. Find your printer in the list. The Guntenprint installer appends the list with all of their drivers. In my case the HP LaserJet is called "HP LaserJet 6L - CUPS+Gutenprint v5.2.6."
I totally get the OpenSource movement now that I use these Getenprint drivers, Handbrake and VLC. It's really great that these developers share their work for free for the benefit of all. I applaud you.
Wednesday, January 19, 2011
Issues with Handbrake .9.5 and AppleTV 1st Gen
It may be just me but I'm having issues with Handbrake .9.5 and an AppleTV 1st Gen box. I've been using the latest Handbrake and all the movies I've encoded playback with video issues where the picture breaks up and becomes discolored for a few seconds. In a couple of movies like Despicable Me and Inception my AppleTV literarily froze after it hit this portion of the movie. I had to reboot my Apple TV by unplugging it. I'm using the Apple/Universal template in Handbrake.
I decided to go back to .9.4 since I never had any issues before.
However, I'd like to use the new version so I'm continuing to do a few experiments. I opened .9.5 and .9.4 up and compared the two. I noticed that under the Advanced tab there's a slider called Psychovisual Rate Distortion. On my .9.4 version of Handbrake this is set all the way to the right. In .9.5 it's set in the middle. I'm re-encoding a movie to see if that might fix my issues. I also upgraded my version of VLC which appears to be at version 1.1.5 now. I was only at 1.1.3. I'll post an update here once I get a chance to watch the whole movie again (boy that's going to be a pain) to see if it fixes the problem.
UPDATE: OK, I've done a little more testing and it doesn't look like a Handbrake issue. It actually appears to be file corruption. I typically Handbrake everything to my local drive and then copy them to the NAS. My iTunes account points to the NAS and my Apple TV plays all of the movies from the NAS. Here's what I discovered. First I searched and then found a fully reproducible place in the movie that fails - white splotches over big areas of the video during certain scenes of Despicable Me. I then tried playing this same move from the version on my hard drive. It played perfectly. OK, it must be a NAS issue. I first tried to reboot it. It had trouble rebooting which led me to think the NAS was in a bad state. Once rebooted I played the NAS version of the movie again and it still had the same issues. So I then copied the move back to my local hard drive to see if it was the movie file or the NAS hardware. The copied version exhibited the same video issues. Ahhh- it must be file corruption. I then copied all of the original handbrake encoded moves from my hard drive back to the NAS and retested Despicable Me. It played perfectly. My conclusion is that the NAS got into a bad state and for some reason started corrupting files a couple of weeks ago. The reboot seems to have solved the problem. Sorry Handbrake developers for the wrong accusations. It was user error (or in my case NAS error).
I decided to go back to .9.4 since I never had any issues before.
However, I'd like to use the new version so I'm continuing to do a few experiments. I opened .9.5 and .9.4 up and compared the two. I noticed that under the Advanced tab there's a slider called Psychovisual Rate Distortion. On my .9.4 version of Handbrake this is set all the way to the right. In .9.5 it's set in the middle. I'm re-encoding a movie to see if that might fix my issues. I also upgraded my version of VLC which appears to be at version 1.1.5 now. I was only at 1.1.3. I'll post an update here once I get a chance to watch the whole movie again (boy that's going to be a pain) to see if it fixes the problem.
UPDATE: OK, I've done a little more testing and it doesn't look like a Handbrake issue. It actually appears to be file corruption. I typically Handbrake everything to my local drive and then copy them to the NAS. My iTunes account points to the NAS and my Apple TV plays all of the movies from the NAS. Here's what I discovered. First I searched and then found a fully reproducible place in the movie that fails - white splotches over big areas of the video during certain scenes of Despicable Me. I then tried playing this same move from the version on my hard drive. It played perfectly. OK, it must be a NAS issue. I first tried to reboot it. It had trouble rebooting which led me to think the NAS was in a bad state. Once rebooted I played the NAS version of the movie again and it still had the same issues. So I then copied the move back to my local hard drive to see if it was the movie file or the NAS hardware. The copied version exhibited the same video issues. Ahhh- it must be file corruption. I then copied all of the original handbrake encoded moves from my hard drive back to the NAS and retested Despicable Me. It played perfectly. My conclusion is that the NAS got into a bad state and for some reason started corrupting files a couple of weeks ago. The reboot seems to have solved the problem. Sorry Handbrake developers for the wrong accusations. It was user error (or in my case NAS error).
Wednesday, December 1, 2010
Making Digital Movies from DVDs - Handbrake Tips and Tricks
The original idea for this blog came about because of all the time I spent trying to rip DVDs and to learn the ins and outs of Handbrake. It took me months of trial and error to get to a point where I felt that I had a pretty good idea of how to do various things and to get around various issues. This is when I thought it was a waste to leave all of that info stuck in my puny brain and that it would be somewhat useful for others if I could write it all down so they could save time and avoid the months of learning that I did. There may be lots of blogs like this already but through my Bing and Google searches I didn't find a single place for all this kind of info. More specifically I found lots of great newsgroups with threads of information but it was kind of time consuming to read through hundreds of comments to pick up the few tidbits of really good information. It really did take me months. I wish I was kidding. Most of the stuff I picked up from other sites so I'm no expert but I thought it might be handy to have a bunch of these in a single place.
First off, some of you may be asking what is Handbrake? Handbrake is an open-source free application that will convert your DVDs to a digital format. In my case an M4V. If you want to convert your personal purchased DVDs to back them up or to watch them on your iPhone, iPad, AppleTV, XBOX, PS3 or other device you will also need to download the VLC Media Player application which is able to read these discs including the copy protected stuff. The guys and gals that wrote this stuff are pretty darn smart and are truly nobel in that they've donated their time to write some incredible software and have given it away for free. Wow!!! Hats off to you.
First off, some of you may be asking what is Handbrake? Handbrake is an open-source free application that will convert your DVDs to a digital format. In my case an M4V. If you want to convert your personal purchased DVDs to back them up or to watch them on your iPhone, iPad, AppleTV, XBOX, PS3 or other device you will also need to download the VLC Media Player application which is able to read these discs including the copy protected stuff. The guys and gals that wrote this stuff are pretty darn smart and are truly nobel in that they've donated their time to write some incredible software and have given it away for free. Wow!!! Hats off to you.
Handbrake must be matched up with the right version of VLC and OS so make sure if you're using a 32 Bit OS that you're also using the 32 Bit Handbrake and 32 Bit VLC. If my memory serves me right I think both apps have to be at the same level in the file system so that Handbrake can find VLC. At least on my Mac I have both in the applications folder with all the other apps. I think I originally had VLC in a folder and it didn't find it.
Anyway, now for some tips.
1) Universal preset - In Handbrake there are Preset Templates. Always use the Apple > Universal template. What this means is you can play the movie on your iPod, iPhone, AppleTV, Mac and Windows computers and pretty much everything else. I used a different preset and the movies wouldn't play properly on my AppleTV. I would get video stutters and the picture would turn white every now and then. I also stopped updating these presets. I updated once and it changed my defaults to a different present and a bunch of videos I ripped turned out bad and I didn't realize it until a few weeks later when I actually tried to watch one of the movies. Bummer.
2) Don't bother with changing the video quality settings. I tried moving the slider to increase the quality but then the video wouldn't play on the Apple TV. I'm probably just doing something wrong but I could never get this to work.
3) Subtitles don't automatically appear - I copied one of those cool kung-fu Chinese movies and none of the subtitles appeared. It was a little difficult to understand. Basically in Handbrake click on the Subtitles tab and then change the Track drop down to Foreign Audio Search. This doesn't always work so you'll have to play with it a bit to get it to work. The Foreign Audio Search is ideal if your movie is in English and sometimes in a foreign language where there are subtitles. In fact I always set the Foreing Audio Search feature now because there were many times where I didn't use this setting thinking the movie didn't have any subtitles only to find that it did later but of course I didn't get them because I didn't turn on subtitles. For example the Godfather is mostly in English but there are times when they are speaking Italian where subtitles should appear but wouldn't if you didn't set the Foreign Audio Search feature. If the movies is always in a foreign language or you want the English subtitles to always appear then you can use the English Subtitle.
4) Handbrake doesn't always get the movie right - When I first started ripping movies I simply put the disk in and let Handbrake pick the move and then I would click the Start button. This doesn't always work because Handbrake always picks the longest track which it assumes is the movie. The movie studios figured this out and created dummy movie tracks to trick Handbrake. If you rip this movie it will actually move chapters around so you'll start watching a film and after a few minutes you'll jump to the ending of a movie and then it will jump to the middle. What I do now is put the DVD in the computer and use the built-in DVD player. I use the DVD navigation and click on Play Movie. From here you can see what track it goes to. This is the track that you want to rip. On a Mac I use DVD Player. If you click on the screen that shows the minutes a couple of times it will eventually show you the Track / Chapter information so you can figure out the track to use. Then in Handbrake I switch to this track to rip. This is the drop down labelled Title.
5) Getting around bad tracks - Sometimes a copy protection scheme the studios use is they have a bad track that will always confuse Handbrake if you're trying to read the entire disk. I think this is how the movie Click is done. I kept trying to rip it and it would get stuck at track 32 or something. I kind of gave up until I realized Handbrake allows you to read a single track and skip all of the others. Go to the File menu and select Open Source (Title Specific). After doing this a dialog appears. In here just type the track number and Handbrake will read only that track. It also saves time because it's not trying to read the entire disk.
6) Sometimes movies and TV shows have lines in them - On the American President DVD I kept getting really poor quality in that the video always had lines in them. It looked like I was watching a video tape recording of a move that was filmed off of an old picture tube TV set. I think I read some place that this is because the video was prepared for old TVs that had interlaced video. To fix this go to Picture Settings and switch to Filters. I'm not exactly sure what picture filter to use but I've been using Detelecine = Default and Deinterlace = Fast. After this I've noticed the picture quality isn't as sharp but it gets rid of all of those horrendous lines. A lot of times old movies end up needing this or those extras on DVDs that were created for TV.
7) Some DVDs can't be read...but they can be - Handbrake uses something called libdvdnav. I'm not exactly sure what this does but for some reason on some DVDs this method prevents the movies from being encoded. If your DVD for some reason doesn't appear to be rippable. Try going to Preferences and click on the Advanced tab. Look for a checkbox labeled Dvd-Video and uncheck it. Try encoding the DVD again. Sometimes this will work. I think libdvdnav is generally a more reliable method of ripping the DVD but sometimes it doesn't work so unchecking this preferences tells Handbrake to use the old method which happens to be better in some cases.
8) MetaX to get Movie Info and Ratings - I had been using Handbrake for roughly 6 months when I was talking to a friend complaining that there was no way to add movie ratings to iTunes which meant parental controls wouldn't work. He told me I should be using MetaX. I couldn't believe that I had been ripping my DVDs for so long without ever hearing about this application. MetaX is an awesome free application that will read the M4V file and will automatically find the DVD cover, actor and description information, movie rating, and chapter information. With a click of a button all of this information gets added as meta data into the movie which then in turn gets picked up by iTunes. It will make your Movie library look really good because it will use the actual DVD covers as the representation of the movie. I had been doing that by hand. Wow what a time saver.
Well that's a brain dump of what I know. I hope you find this useful.
Click here to download Handbrake.
Click here to download VLC.
Click here to download MetaX
8) MetaX to get Movie Info and Ratings - I had been using Handbrake for roughly 6 months when I was talking to a friend complaining that there was no way to add movie ratings to iTunes which meant parental controls wouldn't work. He told me I should be using MetaX. I couldn't believe that I had been ripping my DVDs for so long without ever hearing about this application. MetaX is an awesome free application that will read the M4V file and will automatically find the DVD cover, actor and description information, movie rating, and chapter information. With a click of a button all of this information gets added as meta data into the movie which then in turn gets picked up by iTunes. It will make your Movie library look really good because it will use the actual DVD covers as the representation of the movie. I had been doing that by hand. Wow what a time saver.
Well that's a brain dump of what I know. I hope you find this useful.
Subscribe to:
Posts (Atom)